Apple & Huckleberry Hand Pies
By Alison Steele
For our family, applesauce, apple butter, and cider are the easiest ways to preserve the bounty of the apple trees. I’ve moved away from stovetop stock pots in favor of the electric slow cooker as an energy and time saver, but when the crispness of fall mornings begins, so does the pie making. It’s a labor of love, and one that should be honored with as many smiles and compliments and you can manage to pay the baker. There’s nothing like a warm pie coming from your own oven and made from your own fruit, especially apples. It’s like the county fair, bobbing for apples, and hugs from grandma all in one! These hand pies only come when the apples are ripe.
My mama remembers eating dried apple hand pies in the dead of winter, as a kid growing up on their small backwoods farm. She mostly reminisces about the chores involved in making the food, and afterwards dancing the jitterbug to records at the neighbor’s house through the woods and down the lane. By the time she had a family of her own, there were microwaves, TV dinners, and boxed Jiffy cornbread, so the homemade pies and biscuits usually came from my grandmothers’ and great Aunties’ kitchens. She’ll buy the apple hand pies every now and again at The Cheese Shop, but she says they don’t taste quite like Aunt Ethel’s.
We have a few different apple types, so it’s fun combining them for color and flavor complexity. Most times, when I’m making something with apple, pear, or another fruit that oxidizes easily, I combine them with a hint of lemon and a bright beautiful berry. Huckleberries are dotting the edges of the redwood forest right now, so in they go. Not the easiest to forage, but worth the work, the small wild huckleberry packs more antioxidants than blueberries. In fact, this berry is native to the Pacific Northwest, and will not be cultivated, civilized, or farmed, and will give heck to anyone who tries. There are varieties that are actually blueberry huckleberry crosses that try to claim the name of huckleberry, but none that rival the tartness and nutrients of our huckleberry. It loves living right here, in the Santa Cruz Mountains.
Apple & Huckleberry Hand Pies (makes 8)
Filling:
10-12 apples, cored and grated
½ cup huckleberries
¼ c apple juice
½ lemon
drizzle of apple cider syrup, optional
Pinch of salt
2 T tapioca in 2 T water
Toss all the ingredients together except tapioca and let sit to form juices while making the crust. When the crust is in the fridge, start the filling. Pour off the cold juice that’s been gathering in the bottom of the bowl and mix with the tapioca water. Pour filling into a small saucepan and mix in tapioca juice. If your apples weren’t so juicy you can add a dash of water from the kettle. Cook over medium heat until apple pieces are just cooked and tapioca thickens the juices. Don’t skip this step or you’ll have runny filling. Remove from burner and cool in fridge while you roll out the chilled crusts.
Butter Pie Crust (2 pie crusts)
3 c sifted all-purpose unbleached flour
2 cold stick of grassfed butter grated and kept in fridge (or 1 stick of butter & ½ c rainforest certified palm shortening)
2 T sugar, optional
1/2 c ice water
2 t lemon juice
6-8 sheets of wax paper
2 sheets parchment paper
Sift the flour into a big bowl. Add the butter and cut in with a pastry blender until butter bits are thoroughly covered with flour and about the size of small peas. A tablespoon at a time, add water and lemon juice and toss with a fork until dough starts to form a ball. If using a food processor, these crusts come together in a snap. If so, divide the recipe in two and work them one crust at a time. I don’t have an inch of space for any more gadgets, so I tend to just mix by hand. Divide in half and pour each half onto wax paper and work into a round disc about an inch thick using wax paper instead of working directly with your hands. Fold wax paper up and around to seal off and refrigerate both crusts while flash cooking the filling.
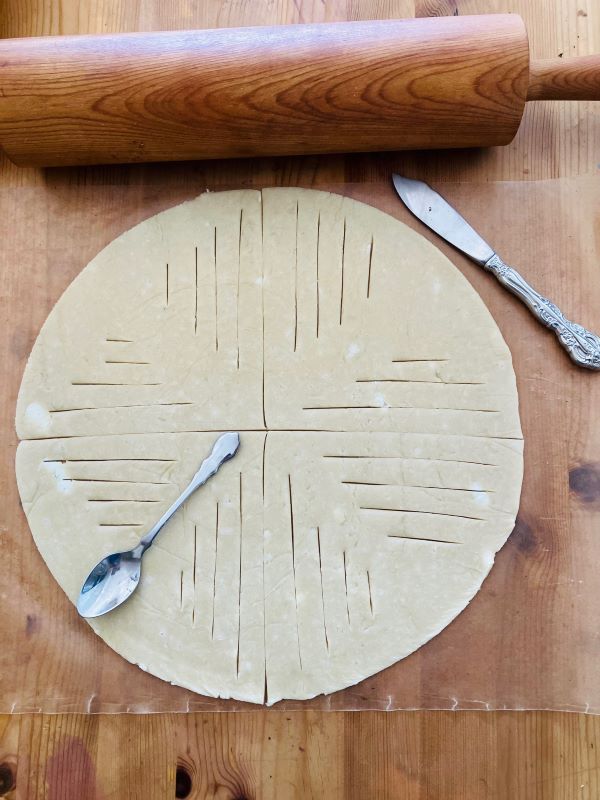
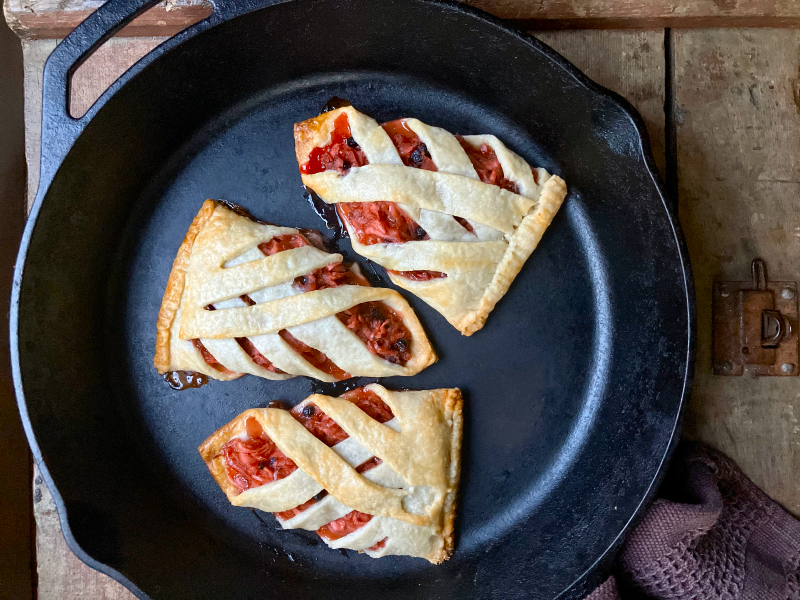
After the filling is flash cooked and chilling, roll out the pie disks into crust a bit thinner than ¼ inch; too thin and they’re hard to work with. Using a knife, trace around a wide stockpot lid to trim the edges of the crust making it an easy to use circle. Slice into quarters, then slash for venting and folds making sure not to cut too close to the curved edge.

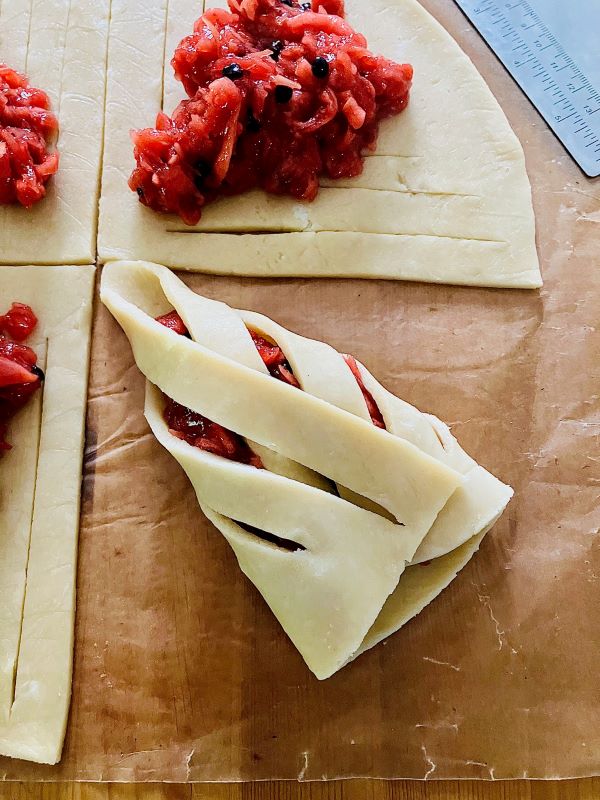
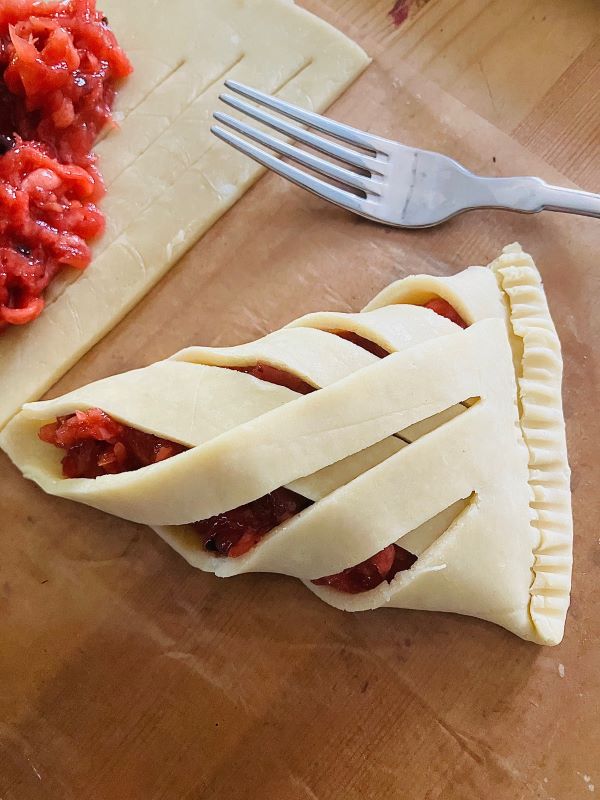
Preheat oven to 375°F. Taking one crust out of the fridge at a time. Spoon 2-3 heaping tablespoons into the middle of each quarter and fold edges over as shown. A thin metal spatula makes this super easy. Finally, fold over the short edge of the crust and crimp with a fork to seal in the filling. Using a spatula, place on baking sheet lined with parchment. Repeat until all four hand pie crusts are filled and folded. Brush with egg whites, sprinkle with sugar and pop in the fridge while working with the last four. Bake middle racks about 15 minutes until bubbling and brown!

A native of Virginia, Alison Steele lives with her husband, two children, and cat in Boulder Creek where she raises quail, chickens, fruit trees, vegetables, and herbs. Alison plays banjo and sings in Sugar by the Pound.
Photos by Alison Steele
Have something to contribute? The San Lorenzo Valley Post welcomes your Santa Cruz Mountains news, story ideas, photos, and letters. Send us an email.
The San Lorenzo Valley Post is your essential guide to life in the Santa Cruz Mountains. We're dedicated to delivering the latest news, events, and stories that matter to our community. From local government to schools, from environmental issues to the arts, we're committed to providing comprehensive and unbiased coverage. We believe in the power of community journalism and strive to be a platform for diverse voices.